Welcome to the jQuery Workshop
Ryan Cosentino
What is jQuery?
jQuery is a widely used JavaScript library that provides easy DOM and CSS manipulation, event handling, AJAX requests, animation, and more. As of May 2019, jQuery is used by 73% of the 10 million most viewed websites.
jQuery’s documentation can be found here and source code here.
Why jQuery?
While most features available in jQuery are also available with standard JavaScript, jQuery’s methods are often easier to use and more concise.
One additional benefit of using jQuery methods is that they take subtle browser differences into account. Specifically, a jQuery method might be implemented differently on Chrome vs IE 11 in order to achieve the same effect. If you use plain JavaScript you would need to take these browser differences into account yourself in order to achieve the same level of cross browser compatibility.
“Installing” jQuery
While jQuery can be downloaded and used locally, it is commonly accessed via a CDN (content delivery network). One is provided by the jQuery website, although companies like Google and Microsoft also provide their own as a public service.
Visit the following link and replace the default HTML in the editor with the following:
<!DOCTYPE html>
<html>
<head>
	<meta charset="utf-8">
	<title>My Page</title>
</head>
<body>
	<h1>My Page</h1>
	<p>Welcome to my page!</p>

	<script src="https://code.jquery.com/jquery-3.5.1.min.js"></script>
	<script>
		// Your Code
	</script>
</body>
</html>
Then click the “Run” button. The first <script> tag loads jQuery.
The jQuery Constructor
A major component of jQuery is the constructor jQuery which creates and returns jQuery objects. This is the primary means of interacting with jQuery.
While you can always access the function with the name jQuery, the single-character alias $ is commonly used instead.
DOM Elements vs jQuery Objects
There is an important distinction between DOM elements and jQuery objects:
- DOM elements reference elements on the page (
p’s,div’s, etc.) and their exact implementations and APIs might differ slightly among different browsers. - jQuery objects act like a wrapper around DOM elements that you can call jQuery methods on. jQuery objects behave similarly to an array in that they have a
lengthproperty and the wrapped DOM elements can be accessed via array[n]syntax wherenranges from0tolength-1. When methods are called on a jQuery object the changes are applied to all of the underlying DOM elements unless specified otherwise.
$(selector)
The constructor $(selector) takes in a CSS selector as a string and returns a jQuery object composed of a collection of DOM elements that match the selector.
For example,
$("p")
creates a jQurey object that contains all paragraph elements. The following are examples of CSS selectors:
"table"selects alltableelements".warning"selects all elements with thewarningclass"#nav"selects the element with an id ofnav"p.mt-2 > img[alt^='cat']"selects all images whose alt text begins withcatthat are also the direct child of apwith classmt-2
.css(propertyName)
This method returns the value of the CSS property propertyName using the first element. For example, $("h1").css("background-color") could return green.
.css(propertyName, value)
This method sets the CSS property propertyName to value for all of the matched elements. For example, $("h1").css("background-color", "blue") would set the background of all h1 elements to blue.
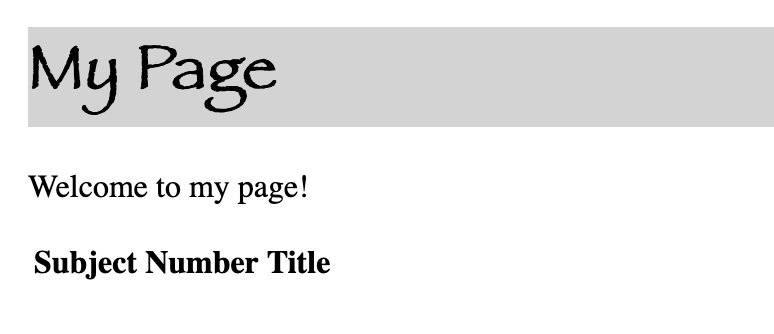
In the w3schools HTML editor, under the line // Your Code, add the line
$("h1").css("font-family", "Fantasy");
After pressing “Run” the header should be displayed in a decorative and playful font.
addClass(className)
This method takes one or more space-separated CSS class names and adds them to each of the matched elements.
To demonstrate this, first add the following to the head section of your document:
<head>
	<meta charset="utf-8">
	<title>My Page</title>
	<style>
		.lightgray { background-color: lightgray; }
	</style>
</head>
and add the following to your script element so it looks like
// Your Code
$("h1").css("font-family", "Fantasy");
$("h1").addClass("lightgray");
After pressing “Run” the header should be displayed with a light gray background.
Modifying the Page with JSON
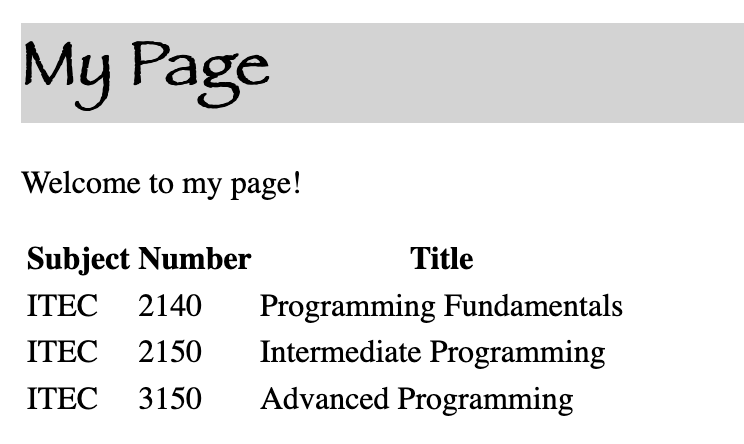
Now we’ll start using jQuery to add elements to the page. First add a table to the start of the body tag, so it looks like this:
<h1>My Page</h1>
<p>Welcome to my page!</p>
<table id="courses">
	<tr><th>Subject</th><th>Number</th><th>Title</th></tr>
</table>
After pressing “Run”, you should see the table with a single header row:
Modifying the Page with JSON
Next, add the following JSON string to your script:
<script>
	// Your Code
	$("h1").css("font-family", "Fantasy");
	$("h1").addClass("lightgray");

	let courses = `[
		{"sub": "ITEC", "num": "2140", "title": "Programming Fundamentals"},
		{"sub": "ITEC", "num": "2150", "title": "Intermediate Programming"},
		{"sub": "ITEC", "num": "3150", "title": "Advanced Programming"}
	]`;
</script>
In JavaScript, strings enclosed with backticks (e.g. `hello`) are called template literals. While template literals are usually used for embedded expressions, as we’ll soon see, they’re used here due to their multi-line support.
Modifying the Page with JSON
In most real world applications, JSON is fetched from a backend server using XMLHttpRequests or the Fetch API. But for our purposes a hard-coded string will do.
Now we can link our table to a jQuery object and prepare to iterate over our JSON list. To deserialize the JSON string, we’ll use the JSON.parse method which turns our string into an array:
table = $("#courses");
for (var c of JSON.parse(courses)) {

}
The for...of syntax creates a loop that iterates over all elements in the array.
Adding Rows to Our Table
We only have one step left: add the course data to the table. To do this, we will use jQuery’s append(content) method which takes a string and adds it to the end of our matched element:
table = $("#courses");
for (var c of JSON.parse(courses)) {
	table.append(`<tr>
		<td>${c.sub}</td>
		<td>${c.num}</td>
		<td>${c.title}</td>
	</tr>`);
}
As was mentioned before, template literals (strings with backticks) can be used to concatenate stings with embedded expressions.
For example, `hello ${name}!` is equivalent to "hello " + name + "!".
Adding Rows to Our Table
After pressing “Run”, we should have a table like:
DOM Traversal
Another important and useful feature of jQuery is DOM traversal. By traversing the DOM, you can find and select elements based on their relative position to other elements. Many methods relate to children, siblings, and parents.
To apply a left border to all children of the body tag:
$("body").children().css("border-left", "4px solid green");

Note: children() only traverse one level down.
DOM Traversal
.eq(index) can be used to select a particular element from a jQuery object. .eq(index) differs from array access [index] in that .eq(index) returns a jQuery object instead of the underlying DOM element.
$("tr").eq(3).css("font-weight", "bold");
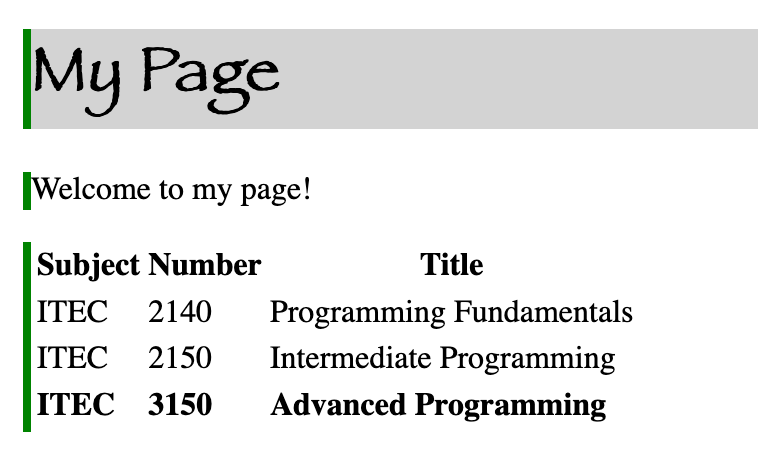
Note: The eq(index) method, like array access, is zero indexed.
DOM Traversal
Other useful methods include
parent()gets the immediate parents of each matched element.prev()gets the immediately preceding siblings of each matched element.siblings()gets the siblings of each matched element.find(selector)gets the descendants of each matched element, filtered by a selector.
Event Handling
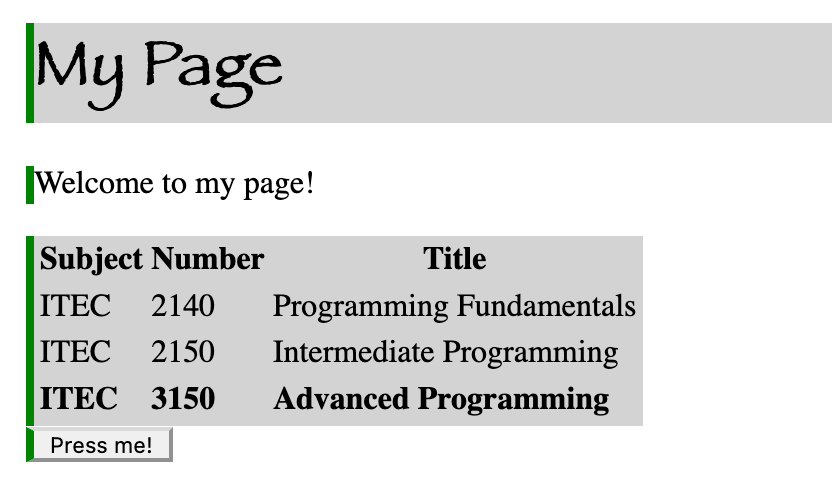
Event handling can be used to execute code when events are triggered, such as key presses or mouse movements. Add a button under the table in the body:
<table id="courses">
	<tr><th>Subject</th><th>Number</th><th>Title</th></tr>
</table>
<button id="btn">Press me!</button>;
and then add the bottom 3 lines to your script section:
$("tr").eq(3).css("font-weight", "bold");

$("#btn").click(function() {
	$("#courses").toggleClass("lightgray");
});
Event Handling
The .click(function) method executes function whenever the selected elements are clicked. In our case, we’re toggling the previously defined lightgray class on our table. Basically, if the table isn’t assigned the class, then jQuery adds it, and if the table already has the class, jQuery removes it.
After pressing the button, your table should turn gray, and pressing it again should restore the original background:
Wrapping Up
This is just a small glimpse of what jQuery can do.
Try the following for a cool animation:
$("#btn").click(function() {
	$("#courses").toggleClass("lightgray");
	$("h1").animate({
		fontSize: 5+Math.floor(Math.random()*50) + "px",
		paddingLeft: Math.floor(Math.random()*300) + "px"
	});
});
In the next Workshop we’ll use Bootstrap to make our page look more professional.