Docker Workshop (includes video)
ITEC 3870 Software Development II,
Ryan Cosentino
(License: CC BY-SA 4.0)

Troubleshooting notes:
- Windows users may need to install the WSL2 update
- If Docker cannot turn on Hyper-V, you may need to enter your computer’s BIOS setup to turn it on
- Make sure you have enough space on your hard drive
What is Docker?
Docker is an OS-level virtualization software that is used to build and run isolated software environments called containers.
What does containerization mean?
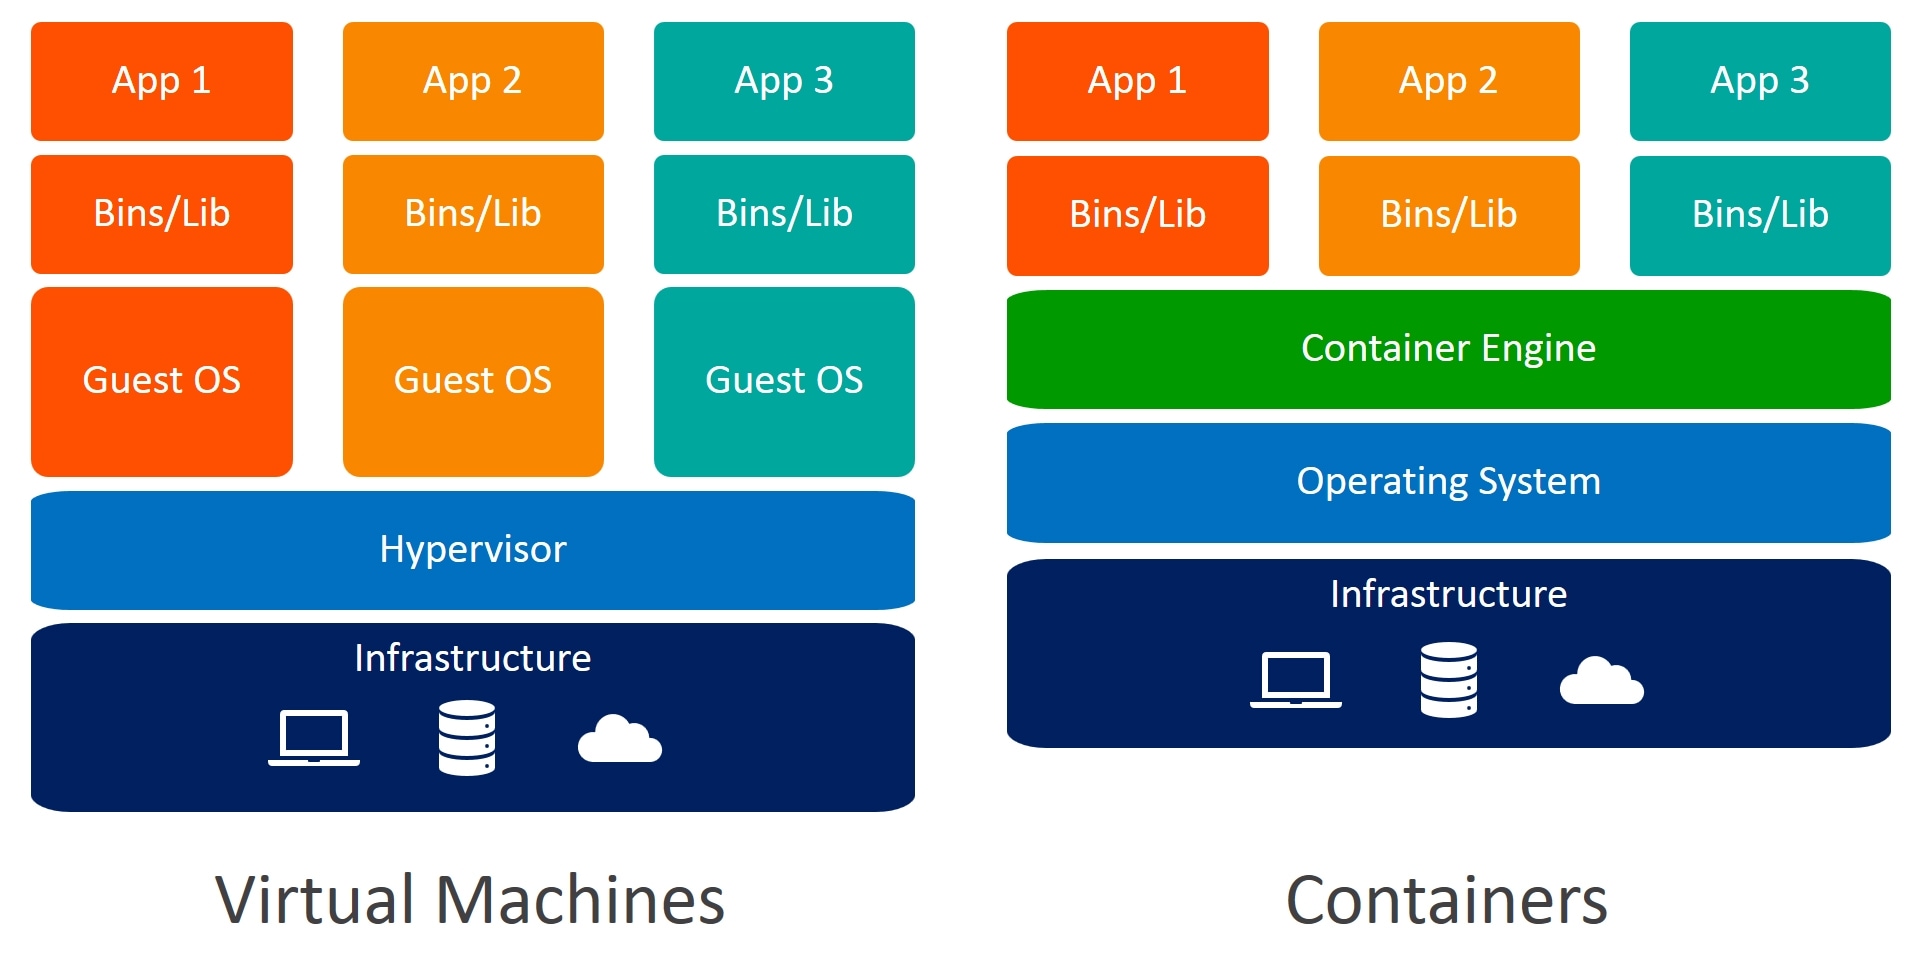
With virtual machines that you get from VirtualBox, entire operating systems are virtualized. While this allows for greater flexibility, it comes with a considerable performance cost. On the other hand, containerization (which is a type of OS-level virtualization) involves isolating running processes at the OS level, meaning that while processes are in a way isolated from one another, they still share the same underlying operating system with the host.
In a way Docker is similar to virtual desktops in Windows or macOS where you can isolate open windows into different desktops. Although the windows in one desktop are isolated from those in another, they are still ordinary programs and not at all “virtualized” in the virtual machine sense. In this example different windows are isolated with help from the window manager, however with Docker processes are isolated at the kernel level. The specific technologies that make this possible will be summarized at the end.
Installing Docker
First download and install Docker Desktop.
In order to use the Docker command line client, Docker Desktop must be running. To verify that Docker is installed and running, run the following in your terminal:
$ docker version
The output should contain a section for
- Client: Docker Engine - Community, and
- Server: Docker Engine - Community
Images and Containers
Images are read only templates containing libraries, programs, data etc. that are used to create docker containers. A container is a runnable instance of an image. To use an OOP analogy, you can think of an image as a class and a container as an instance.
Docker Hub is the largest public registry of Docker images and contains images ranging from Linux distributions like Ubuntu or Debian to collections of prepackaged software like MySQL or PostgreSQL. Images can be tagged such as
python:3.9.1aka Python version 3.9.1python:3.9.1-busterbased on the Debian 10 (Buster) Linux distributionpython:3.9.1-alpinebased on the minimal Linux distribution Alpine
If a tag isn’t supplied, Docker will use the :latest tag.
First Container
First we’ll create and run an Ubuntu container:
$ docker run -it --rm ubuntu bash
where
-itis short for--interactive --ttywhich starts the container in interactive mode and lets you enter text via the terminal--rmdeletes the container after it exits (but not the image)ubuntuis the name of the imagebashis the command executed when the container starts
(technically bash is already the default entrypoint for the Ubuntu image and is only used here to showcase the [COMMAND] argument)
First Container
If this is your first time using the Ubuntu image Docker will first download it from Docker Hub. If everything has gone according to plan, you should see a new prompt similar to
root@a5d9a7a5232c:/#
where
rootis the current usera5d9a7a5232cis the hostname (randomly generated by Docker)/is your current working directory (root directory in this case)#is another indication that you’re logged in as root (non root users have a$)
Note: In documentation, it is common to use a single dollar sign $ prompt (instead of something like root@a5d9a7a5232c:/#) for simplicity, especially when the information conveyed in a longer prompt isn’t relevant to the concepts at hand.
First Container
You can try running commands like ls to list files and folders:
$ ls
bin  boot  dev  etc  home  lib  ...  media  mnt  opt  proc  root  run  sbin  srv  sys  tmp  usr  var
or ps aux to list running processes:
$ ps aux
USER       PID %CPU %MEM    VSZ   RSS TTY      STAT START   TIME COMMAND
root         1  1.0  0.1   4112  3492 pts/0    Ss   17:13   0:00 /bin/bash
root        10  0.0  0.1   5900  3024 pts/0    R+   17:13   0:00 ps aux
Note: If this were a virtual machine, you would see tens, possibly hundreds of running processes instead of a small list of isolated ones.
First Container
You can also try factoring very large numbers:
$ factor 12345678901010101010101010987654321
12345678901010101010101010987654321: 19 853 32069 398053 465067 128312953569637
or:
$ yes Dr. Gunay is awesome
Dr. Gunay is awesome
Dr. Gunay is awesome
Dr. Gunay is awesome
Dr. Gunay is awesome
...
First Container
To quit, run the command exit. Since bash (PID 1) was the initial process used to start the container, once it exits, the container stops.
Because we used the --rm option, Docker should delete the container once it exits which you can verify by typing
$ docker container ls -a
however the Ubuntu image should still be saved locally:
$ docker image ls
REPOSITORY        TAG           IMAGE ID       CREATED       SIZE
ubuntu            latest        f63181f19b2f   12 days ago   72.9MB
Running Python
As another example, you can also try running Python instead of bash:
$ docker run -it --rm python:slim

Python 3.9.1 (default, Jan 12 2021, 16:56:42)
[GCC 8.3.0] on linux
Type "help", "copyright", "credits" or "license" for more information.

>>> a = 5
>>> print(a + 2)
7

>>> exit()
Running Python 2.7
You can also create containers for different versions of Python:
$ docker run -it --rm python:2.7-slim

Python 2.7.18 (default, Jan 12 2021, 16:56:42)
[GCC 8.3.0] on linux
Type "help", "copyright", "credits" or "license" for more information.

>>> a = 5
>>> print a+2
7

>>> exit()
Dockerfiles
Say you’d like to slightly customize an image available on Docker Hub. If you’re trying to run a Python application you could start off with the image python:slim, add your application and install any dependencies to create an image specific to your app. This is done using a Dockerfile.
A Dockerfile is just a text file containing a list of commands used to build an image. The default filename is just Dockerfile. Dockerfiles must begin with a FROM instruction which specifies a parent image, such as python:3.9 or node:15.7.
Common Dockerfile Commands
COPY <src> <dest>
Copies files on the host at<src>to the container at the path<dest>RUN <command>
Executes the command once inside the imageENV <key>=<value>
Sets the environment variable<key>to<value>ENTRYPOINT <command>
Executes<command>whenever the container starts
You can read more about all the different commands here.
Python Dockerfile
Create the file hello.py somewhere on your computer with the following lines:
import os

name = input('What is your name? ')
print(f'Hello {name}!')

print(os.environ.get('GOODBYE'))
But what if you don’t have Python installed? That’s perfectly fine! With Docker you can download a Python image to run the code without actually installing Python on your host computer.
Python Dockerfile
In the same folder as hello.py, create the file Dockerfile and add:
FROM python:3.9-slim

ENV GOODBYE=adios

# You can also add comments :0
COPY hello.py .

ENTRYPOINT python hello.py
Once you’ve saved the file, open a command prompt in that directory and run
$ docker build -t hello .
which builds the image and tags it with the name hello. You should be able to see the image by typing
$ docker image ls
REPOSITORY        TAG           IMAGE ID       CREATED          SIZE
hello             latest        50b4f80bd32a   13 seconds ago   114MB
Running Your Image
Use the following command to run your image:
$ docker run -it --rm hello
What is your name? bob
Hello bob!
adios
After entering your name, the container should print a greeting, a closing, and then exit. Because of the --rm option, the container should be deleted.
How Docker Works
On Linux, Docker utilizes two technologies of the Linux kernel to achieve this containerization:
Namespaces are used to isolate kernel resources such as mounted file systems, hostnames, process IDs, and user IDs. A single container will have a namespace for each of these resources.
cgroups (control groups) are used to isolate system resources such as CPU, memory, disk I/O, and networking.
Click the down arrow for more information!
How Docker Works
Essentially, whenever a process tries to access kernel resources, the kernel uses the process’s allocated namespace to determine which resource to provide.
For example, in a container’s PID namespace Apache might be running with process ID 1, but it might have process ID 650 in the initial (“root”) PID namespace that was created when the computer started. From the root PID namespace’s perspective, Apache is just another process along with all the other processes running on the operating system, however from Apache’s perspective, it looks like it’s running alone with possibly a few additional processes used in the container.
How Docker Works
Other resources can also be containerized in this way. In one container the path /bin/bash could point to the Bourne Again Shell executable while in another container the file might not exist. This determination is made at the kernel level and completely transparent to the processes running inside the container.
While a technical understanding of the technologies mentioned above isn’t necessary to effectively use Docker, it often helps in understanding the “why” component. For details on how containers can be implemented, check out this video where a simple version of Docker is written using Go.